Friday, March 11, 2011

Woo-hoo Friday!


Oh thank goodness, it’s been a LONG week!  I’m SO ready to go out and party a bit tonight.  Here’s how I spent my morning.

100_0330

They’re ready for binding but I’m bored & setting them aside for now.  Here’s the one I finished yesterday.

100_0327

It’s a little housewarming gift for my best friend who I’ve been helping move.  It measures 5 1/2 x 8 1/2.  The ones up top are also for gifting.  I found the design online, I think it was a tattoo sketch.  And that’s all for now, I have to go babysit and set up my friend’s computer.  Have a nice weekend!

Monday, March 7, 2011

Design Wall Monday


100_0319

I wish I had room for an actual wall but here’s my table in progress.  This is Sugar Pop! by Liz Scott for Moda, another charm pack, this one paired with a dark almost turquoise solid (it looks very green here for some reason).  I’ve had a zigzag quilt on my list for a while now and I used that method where you sew two fabrics RST around the edges and then cut on the X.  Quick & easy, we’ll see if I can get this top finished today, I have to go in to work soon.

100_0323

Here ‘tis!  Might add a border in the blue but I love it with the morning sun shining through.  Boy was I sick of triangles, lol.

100_0314 

Editing to add Monday night’s progress (hope you can see the tons of stitching).

100_0322

I’ve decided to attempt hand quilting this Central Park #2.  I don’t have a walking foot and want simple straight line quilting, I’m afraid my less than stellar meandering will distort the nice lines.  If it goes well I’ll also hand quilt this one from Saturday’s sewing marathon.

100_0318

Don’t forget to swing by Judy’s for more Design Wall Mondays & Quilt Story for Fabric Tuesday!

Saturday, March 5, 2011

Quilt top a day


Well OK, 2 days, but still, this was a fast project!  I got the charm pack yesterday morning and dove right into it, no pattern, no real plan, I just wanted white & on point blocks.  They’re put together log cabin style so it was a lot of back and forth to the ironing board but I really love it! 

These photos are SO bad, I can’t believe I’m sharing them here but you can see in the layout that I should have counted before I started sewing, I had to add a couple more blocks and remove all of the bottom triangles and flip them around, lol.  I’m leaving off the corner triangles on purpose, gives it a different look being non-rectangular.  I have no idea how I’ll quilt it so I’m setting it aside for a few days.

100_0317

100_0318

The charms are Dilly Dally by Me & My Sister Designs for Moda.

Friday, March 4, 2011

Back up and running!


The internet, that is.  Need to get my butt back out on the road running but I’m sick of the cold!  I’m about half caught up on my blog reading, gosh did I miss that for the last week.  We’ve already called & set up internet & tv with a new company but I’m not cancelling the current company until they get here next week.  I’ve done SO much sewing!  Even knocked out a 3 day work order, delivered it and picked up some more for the weekend.  I’m not sewing on it today though…some fluffy mail arrived a couple hours ago.

100_0313

My thanks again to my supplier, I’m totally addicted to these little charm packs.  I already dove into the Dilly Dally, it’s about half cut and assembled for another cute baby quilt.

Did anyone catch the boo-boo in my 2nd Central Park quilt?  I left out a whole row of sashing, oops!  Here it is fixed & ready to quilt when I figure out what I’m doing with it.  I can’t believe I laid it on the kitchen floor but that’s all that was available right now.  Not that wonky, I was just in a rush & didn’t lay it out nicely (that would mean crawling on the floor that surely has some cat hair on it, I did give the quilt a good shake, lol).

100_0314

OK, back to work, just had to check in, happy sewing!

Monday, February 28, 2011

Design Wall Monday—Lots of finishes


AKA, I haven’t had internet access in 4 days, argh!!  I’m going batty but I did get a lot of sewing done.

First up, I finished piecing this top.  No wonder I never do traditional quilts, it gave me fits due to non-exact cutting of the squares.  This used every tiny scrap of my 2 Central Park charm packs.  I haven’t decided what to back it with yet, might have to spring for a yard of one of the prints (if I can get to a real quilt store to buy it).  Excuse ugly curtains & some freshly dyed fabric drying there behind it, we played with snow dyeing last week.

100_0301

Next up, I finally finished this little mini.

100_0302

I quilted around some of the veins in the background fabric too.  This is Jennifer’s Fairy Dreaming applique pattern again.  Once again I skipped the borders & did my own thing, adding the sun & moon.  It measures about 12x12”.

100_0304

Next, I finished the little square I submitted in the QuiltStory contest last month.  Raw edge appliqued around Fishy, SID for the rest.  It measures 10x12”.

100_0307

And I machine quilted another of the Heather Ross fish quilt tops I had laying around for several years.  It still needs binding but I’m kind of sick of fish quilts so it’ll sit a while longer.  I didn’t do a great job quilting and it’s heavy (even though it only has flannel for batting).  Nice warm quilt though, good FMQ practice, used up recycled denim.  Measures about 45” square.

100_0305

Editing to add the last one, this was a practice silk screen run I did last summer.  I saw a similar design on someone’s blog (I think) and added some elements from some fabric I had, hand drawing my own interpretation onto the screen.  I backed & bound it in that pretty batik & hand quilted it last night.  It measures about 9x10”.

100_0311

Don’t forget to stop by Judy’s for more Monday fun & I’m linking up with Quilt Story for Fabric Tuesday.  Thanks for visiting!

Wednesday, February 23, 2011

Anyone can dye their own quilt fabric


Dyeing fabric came up recently on a board I visit with several commenters saying it looked neat but they could never do it themselves.  Huh?!  Dyeing is super easy, inexpensive & fun!  Here’s a quick, freespirited tutorial for anyone who’s scared to give it a try.

100_0272

Assemble your supplies: Containers dedicated to dyeing (do NOT use later for food), 100% cotton fabric works best, Procion cold water reactive dyes (available at chain craft stores, Dharma Trading Co, etc), Soda Ash (see next pic, I buy it at Walmart in the pool supplies aisle), salt.  In addition I have wax paper to cover my countertop as the dye will stain it and your sink unless you rinse quickly, a knitting needle to stir because I couldn’t find my big spoon & water.  Some people add something called urea to the water, I can’t find mine, it’s a wetting agent, it’s not necessary for this method but it’s good for tie dye. If you’re particularly messy wear disposable gloves, I’m being careful because I have to go to a funeral tomorrow & have no gloves.  You may also want a dust mask as it’s not good to inhale dry dye powder, once it’s in water you’re ok.  NOTE: soda ash is not baking soda or washing soda, your container should say sodium carbonate, this is what makes your dye permanent.

100_0273

OK, disclaimer—I’ve been dyeing for about 10 years and sold my dyed wares online for several of those.  I don’t measure anything, seriously.  So if you’re one of those cooks or rule followers who really needs a recipe or pattern this isn’t it, I’m trying to show you how simple the process is!  There are many excellent tutorials online with more detailed instructions.  I dye the same way I knit, quilt & well, everything, LOL!

100_0274

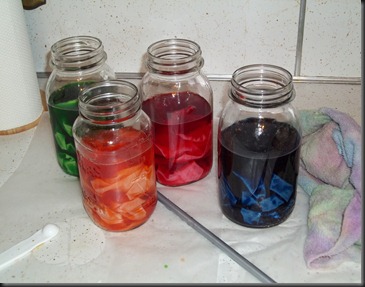
I wanted a marbled appearance so I got my fabric good & wet, rinsed, wrung it out & set aside.  Add slightly warm water to jars and about 1/8 tsp of dye powder (be sure to rinse & dry spoon between colors).  Add a little shot of salt (not required but it seems to make the colors a little brighter).  Stir well.  Add 2-3 Tbs soda ash to jars, really stir well, it takes a while to dissolve.
100_0275

Stuff fabric in jars loosely, stir it around.  Go back and check on it for a quick stir every so often so it dyes fairly evenly, I didn’t want a lot of really white areas in the finished fabric this time.  My fabric is cut to approximately fat quarters, for larger cuts use bigger containers.  Remember to rinse your stirring tool after each jar so you don’t mix the colors.

Now if you would prefer a different look with more colors here’s how I do it.
100_0276

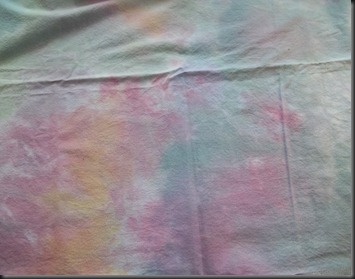
Start with dry fabric, stuff it into the jar.  If you want more white in the finished piece don’t prewash the fabric.  The piece above was washed, it was all I had handy to photograph.  Normally I like more contrast & veins of white through mine.  Look how full your jar is, I like it just over half full of fabric, you’re going to need headspace for the last step but not too much that you’re wasting your soda ash.  If you’re using a large piece of fabric a pitcher works pretty well but you don’t want a great big bucket.  Mix your water, salt & dye in a separate jar (one jar per color).  Pour one color at a time into the fabric jar over different sections of fabric. Once you’ve poured however many colors you want you’re ready to set it.  You should see a little fabric peeking out of the dye water, that’s a good level to stop dyeing & start setting.  Mix some soda ash with slightly warm water, I use a pretty concentrated mix for this method, say 1/8 cup to a large mason jar and use that for several fat quarter jars, stir well to dissolve.  You want to pour about an inch of soda ash water over your dye water which is why I mentioned the container size.  If you’re using a great big bucket you’re going to need a lot of soda water.  Don’t freak out now, it might look like a big muddy mess of gray/black water.  Normally I dye like colors that play nice together (like the blue/purple/red thing up there, or yellow/orange/green, you can’t really mess those up).  It’s very hard to dye black & takes a lot of dye, sometimes it turns out olive, purple or gray.  Red’s tough too, you need a strong concentrate and I mix a couple reds together to avoid pink (in the example way up top that’s fire engine & carmine red mixed).  Turquoise is one of the easiest colors and in my experience always comes out nice.

OK, whichever method you’re doing you want the fabric to sit in the dye for at least 8 hrs, I once waited 3 days to rinse mine.  **If you have pets or children please cover the jars & put them somewhere out of their reach &/or label them, it would be bad to mistake dye water for koolaid!**  When you’re ready to see your results carefully pour dye down the drain (it’s safe for septic & sewers).  Rinse in cool water until it runs clear, then rinse in warm to see if anything runs.  It might take a while….then wash in the washing machine, I use just a little bit of regular laundry detergent but they make a special soap called synthrapol recommended for the final wash (and for pre-washing fabric too).  Machine or hang to dry, cut, quilt & enjoy! 
 dye2

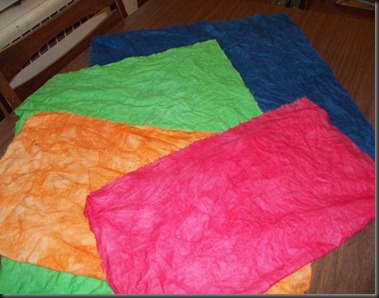
Mine sat in the dye about 18 hrs.  Above, after sink rinse.  Below, after machine wash.

dye3

Procion Bright Green, mix of Fire Engine & Carmine Red (still kind of pink today needed more dye, lol), Cobalt Blue & Brilliant Orange.  I didn’t use quite enough orange dye and you can see I forgot about stirring them after a while so I got some light areas, most obvious on the orange.  But I like them!  Perfect for a baby quilt with a lot of white background.

Sunday, February 20, 2011

Design Wall Monday


100_0264

Another finish!  I can’t get into the whole “process blogging” thing, I like to show & tell.  Though I will show you how I almost laid this out.

100_0260

Sounded good in theory but horrific when I laid it out.

100_0263

My nighttime photos are pretty awful, I’ll try again before I gift it.

100_0262

This is Central Park by Kate Spain for Moda.  My first “designer” fabric purchase in many years and I adore it!  Hand tied, machine quilted in the borders.  The border squares were pinked & raw edge appliqued.  The binding fabric was some purple tie-dye cotton I found that went with the line pretty well, I thought patchy binding with the remaining scraps might overwhelm it.  The back is white.  Quilt measures 36” square and I really need to work on that whole mitered border thing, I got it but it took a lot of fussy sewing.

Up next on the hit parade is a little work quilting & I’d like to make another biscuit quit in satins.  We’ll see how long I can hold off before I buy more charm packs, I think I might become an addict!

Thanks for stopping by & don’t forget to check out Judy’s blog for more Design Wall Mondays!  I’m also doing my first Quiltstory Fabric Tuesday!